How to Correctly Install Mods & CC
There are two rules we would like you to be aware of before joining:
1. No pirated game support
We offer support for current, legal game versions only. Outdated game versions, pirated games or packs, DLC unlockers, etc. are not supported for various reasons.
2. No support if you are using mods depicting rape, bestiality, or pedophilia
Please be aware that if those files are found in your error report, we reserve the right to ban you instantly and without warning depending on the severity.
The rest of the rules are available here or in the Rules Channel (#scroll-of-summoning) after joining the Discord Server.
Still wanna join?
Far too many mod download pages have the instruction “just place the files directly into your Mods folder”, but this is definitely the wrong way to do it!
Dumping everything into your Mods folder without creating sensible subfolders will leave you with pure chaos and will make managing your mods, updating them and troubleshooting your game very, very hard. This is especially vital for mods that come with a lot of files that are not named with the creator’s or even the mod’s name, for example like Sacrificial’s Mods. If you place loose files into your folder that are simply called “camera.package” or “star.package”, etc, then you will sooner or later lose track of which mod they belong to. Leaving files like this in your mods folder when you remove the mod in question will cause errors in your game and will cost a lot of time and nerves to find and remove. For this reason it is advisable to create a folder for each and every mod you download, right when you download it.
Let’s go through this step-by-step, following an example mod:
Step 1: Download the mod
As an example we will download the Pickpocketing Mod. It comes as a ZIP-File. Windows users can recognize ZIP files by the .zip file extension, by the zipper symbol on the folder, and by the file type “Compressed (zipped) Folder”.
Step 2: Extract the mod
If a mod comes in a ZIP, RAR or 7z compressed folder you cannot simply move it into your Mods folder, as the game will not be able to read it correctly. In this case you need to extract the mod.
For WINDOWS, we recommend using either the native Windows extracting, or the program “7-Zip”, as it’s free of charge and easy to use. To learn how to extract a file with MAC have a look at this wikiHow tutorial for ZIP files and this awesome guide by Meg for RAR files.
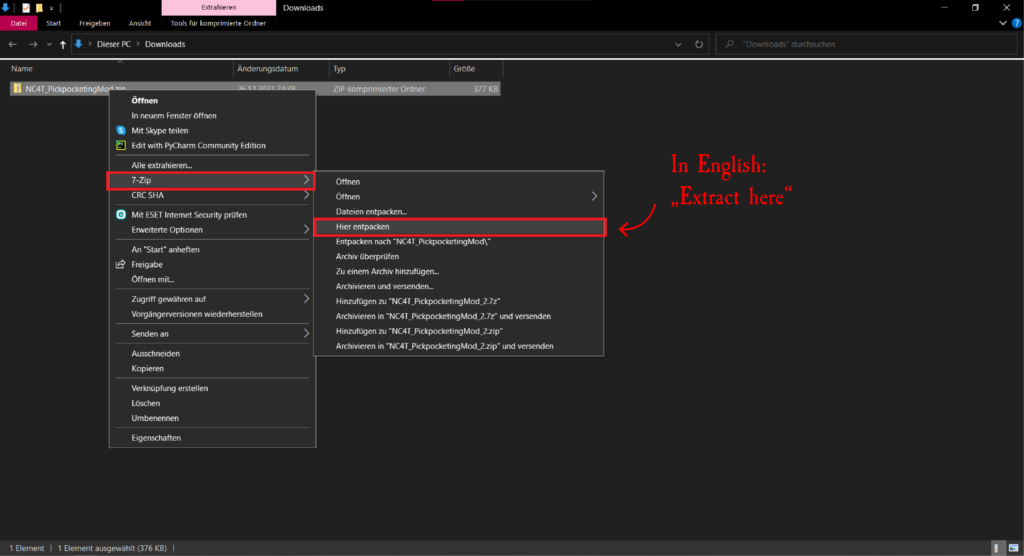
If you’re on Windows and using 7-zip, you can extract the ZIP-file by right-clicking on it and selecting 7-zip > Extract here.
If you are using a different tool to extract a mod, look for a similar option. It should always say “extract here” or something similar.
This will place the extracted files into the same folder as the ZIP file.
Step 3: Delete the ZIP and create a subfolder
As explained earlier, ZIP files should never, ever be placed in your Mods folder. We already extracted the mod from the ZIP, so we don’t have a use for it any longer. Delete the ZIP file.
IMPORTANT: If a mod already comes with a specific folder structure, skip the rest of this step and continue with Step 4 to keep everything the same way as you downloaded it. Usually the modder has reasons for specific folder structures.
To forego any confusion or chaos, we will create a subfolder for the mod right here in the download folder. It is recommended to call it by CreatorName_ModName, or something similar, to keep the Mods folder as organized as possible. We will call our new example folder “NC4T_PickpocketingMod”. Move all mod files into this new folder. It is important that you never separate mod files, or the mod will not work correctly! Exceptions are optional mod files of course, those are usually either “pick and choose” or are requiring specific packs, so always read the instructions and explanations on a mod’s download page.
Step 4: Move the folder into your Mods folder
It’s now time to move the folder into your Mods folder, so that the game can access it.
The Mods folder is located on your main drive in your Documents folder under \Documents\Electronic Arts\The Sims 4\Mods. Under normal circumstances, the game will ONLY read files from this folder and nowhere else, so make sure you have the correct folder, before moving the mod.
To move the mod, simply drag the NC4T_PickpocketingMod folder we just created into your Mods folder.
In this example we are using a Script Mod. Script mods are mods that come with a .ts4script file. They cannot be placed deeper than ONE subfolder into the Mods folder, which means that the subfolder we just created in Step 3 has to be placed directly into /Mods.
If you are using CC or TUNING mods (mods that only have .package files and no .ts4script files), you can go up to FIVE folders deep from the Mods folder.
IMPORTANT: Never separate files from mods that belong together! If a mod comes with both a script and a package file, make sure to keep them in the same subfolder.
Step 5: Enable mods in your game options
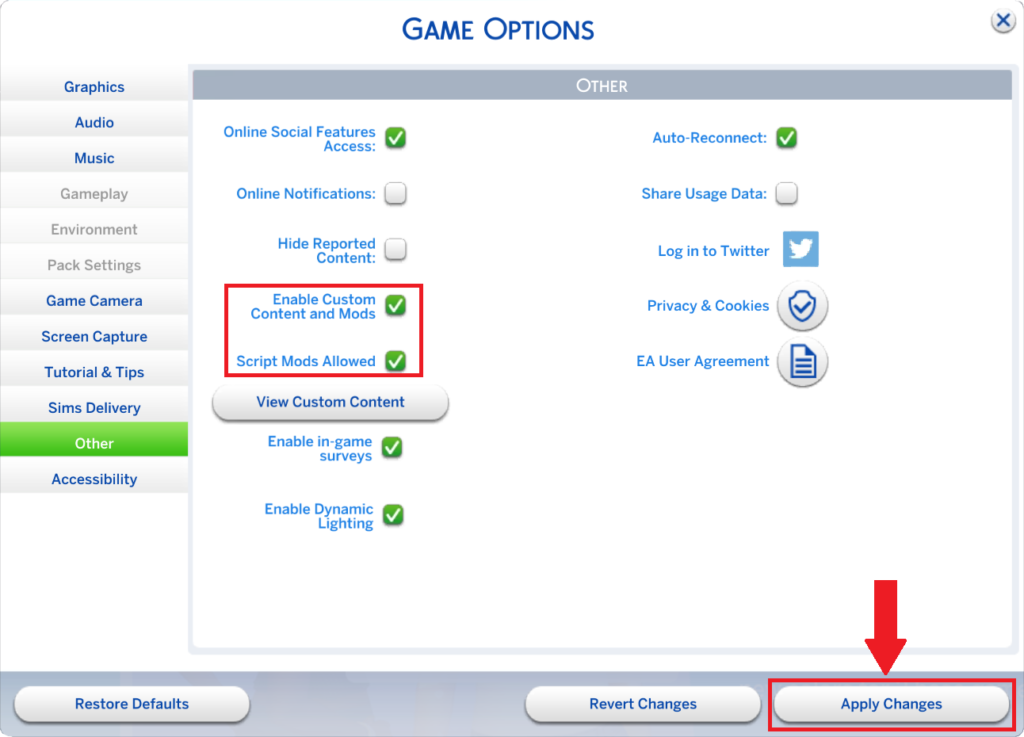
The game won’t read your mods, if they are not enabled in your game options. To enable mods, open your game and click on “Options”. Here, go to the “Other” tab. You will find two options to enable mods:
- Enable Custom Content and Mods
- Script Mods allowed
Both of these options need to be checked in order for all of your mods to work. Afterwards, click on “Apply Changes” before leaving the options. A game restart is necessary for these changes to take effect.
Please note: (Nearly) every patch turns these options off, so you will need to re-enable your mods after patching and updating them, or they will not work.
Some additional advice on updating, uninstalling and downloading mods:
Do not rename mod files! Renaming not only may cause mods to not work correctly anymore, it will also cause issues when updating mods or slow down your troubleshooting process. Always leave the file names as they are and use folders to organize everything the way you want it to be.
To update a mod you need to download the new version from the creator’s website, delete the old files, then extract and place the new files into the old folder. It is important that you delete the old files first, and not simply replace them, as file names can change and cause you to suddenly have a duplicate mod in your folder!
To uninstall a mod again, simply delete the folder and it’s contents from your Mods folder.
When uninstalling custom food mods like SCCO make sure to delete all custom food from your game before taking the mod out: check your lots, fridges, Sim and household inventories of all families you have played. If a piece of custom food is left on a lot before uninstalling custom food mods, it might prevent you from loading the lot and will kick you back to the world select screen instead with an error code.
When downloading mods always check the date of when it was last updated! If a mod is older than a couple of months, chance are high that it’s broken. This is of NOT true for every mod! We advice to check the date, and if it is an old-ish mod, read the instructions (maybe the creator confirmed it’s still working) or comments of other players. If you are still unsure whether it works or not, download and install it as above, but test it in your game first, before downloading and installing the next mod, so you can quickly take it out again if it causes any issues.
Do NOT, NEVER EVER download Mods folders from YouTube or other sources! If you wish to know why, check out our DIY Guide about “The Evils of Downloading Mods Folders” (coming soon).
When downloading mods beware of different mods that basically add the same things to your game. There are a lot of creators that create similar mods as others. Oftentimes those mods will not work together and instead conflict with each other, or unnecessarily bloat up your save and cause longer loading times. Always read through the descriptions and decide which mod suits your playstyle better, or test them one by one before deciding.
Check the Broken Mods List! If you are looking for mods or updates, check out the awesome Broken Mods List by my friend Scarlet. It offers you a great overview of which of the most common mods are currently broken and which have been updated or confirmed working with each patch and is being maintained meticulously.
If you wish to learn more about mod folder organisation, please have a look at Part Six of our DIY Troubleshooting Guides: “How to Organize your Mods Folder“.
And that’s it, we’re done! Happy Simming!


